
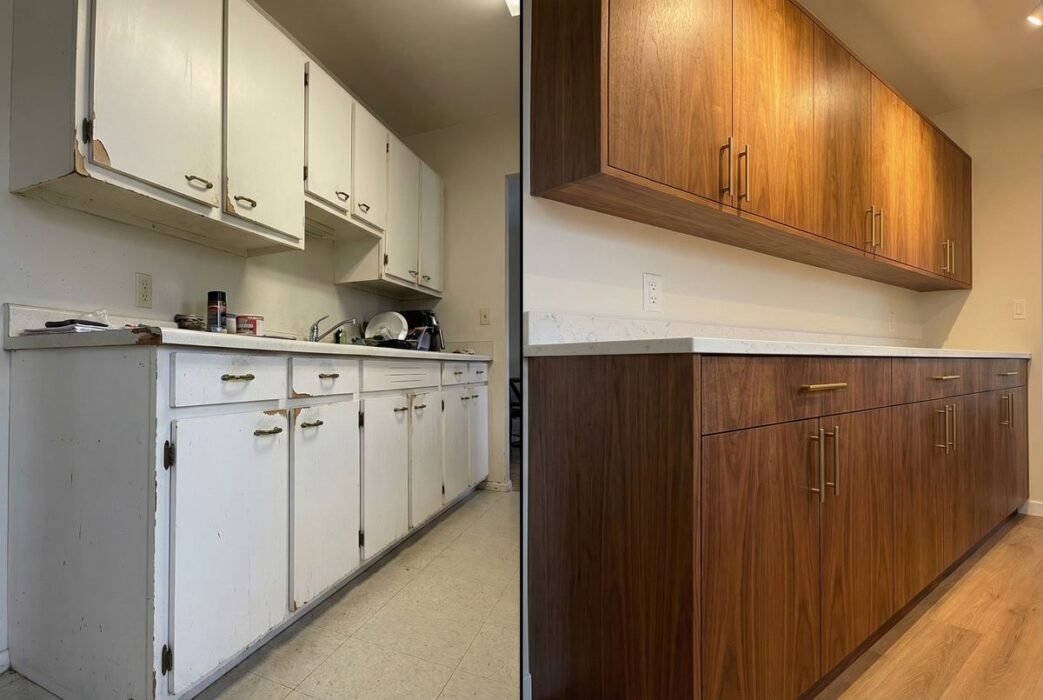
Are your kitchen cabinets looking tired and outdated, but a full replacement isn’t in the budget? DIY kitchen cabinet refacing offers a brilliant solution, allowing you to achieve a stunning, fresh look without the expense and disruption of a complete remodel. This comprehensive guide will walk you through every step of the process, empowering you to transform your kitchen with confidence.
Cabinet refacing involves updating the visible surfaces of your existing cabinets. This typically includes replacing old cabinet doors and drawer fronts, and applying a new veneer to the cabinet boxes. It’s a cost-effective renovation that can dramatically alter your kitchen’s aesthetic, making it feel brand new, notes Hawaii Coastal PM specialists.
Why Choose DIY Kitchen Cabinet Refacing?
Opting for a DIY approach to kitchen cabinet refacing comes with several compelling advantages. Beyond the significant cost savings compared to purchasing new cabinets, it offers a rewarding personal project and the flexibility to customize your kitchen exactly to your taste.
- Cost-Effectiveness: Save thousands by reusing your existing cabinet boxes.
- Less Disruption: The process is generally quicker and less messy than a full kitchen demolition.
- Eco-Friendly: Reduces waste by repurposing functional cabinet structures.
- Customization: Choose from a vast array of veneers, door styles, and finishes to match your desired aesthetic.
Essential Tools and Materials for Your Refacing Project
Before diving into the work, gathering the right tools and materials is crucial for a smooth DIY kitchen cabinet refacing experience. Having everything on hand will prevent delays and ensure a professional finish.
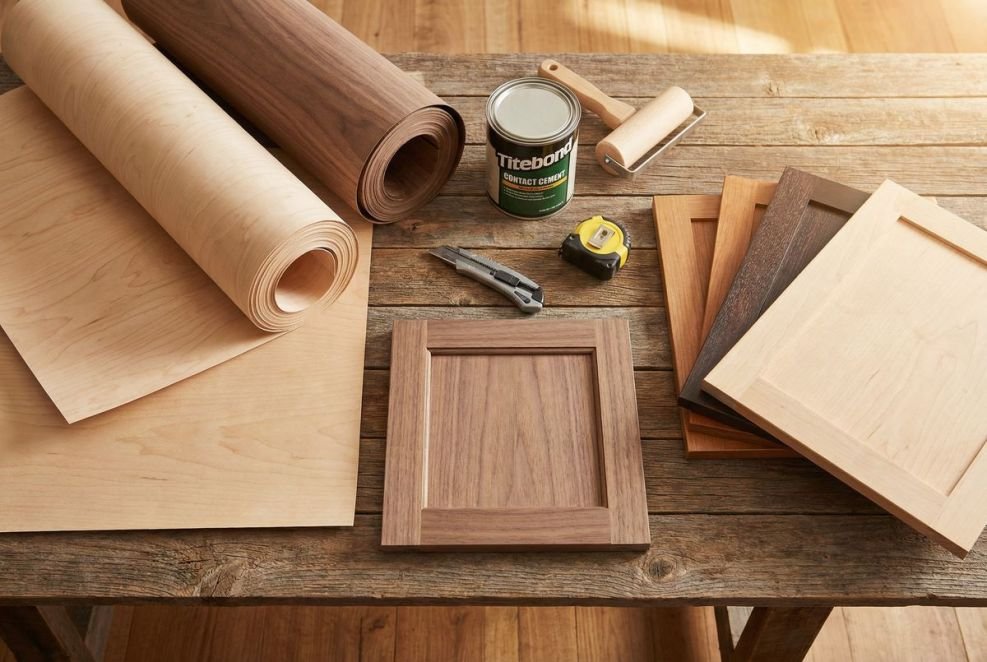
Tools You’ll Need:
- Measuring tape and pencil
- Utility knife or veneer trimmer
- Screwdriver set (manual and/or power drill)
- Sanding block or orbital sander
- Adhesive roller or brush
- Clamps
- Straightedge
- Heat gun (for pressure-sensitive adhesive veneers)
- Safety glasses and gloves
Materials to Purchase:
- New cabinet doors and drawer fronts
- Veneer (wood, laminate, or rigid thermofoil)
- Contact cement or pressure-sensitive adhesive
- Edge banding
- New hinges and drawer slides (optional, but recommended for a complete upgrade)
- Cabinet hardware (knobs, pulls)
- Cleaning supplies (degreaser, tack cloth)
Step-by-Step DIY Kitchen Cabinet Refacing Guide
Follow these detailed steps to successfully reface your kitchen cabinets and achieve a professional-looking result. Patience and precision are key to a beautiful outcome.
Step 1: Preparation and Disassembly
Begin by emptying your cabinets and drawers. Remove all existing cabinet doors, drawer fronts, hinges, and hardware. Label each piece as you remove it to ensure easy reinstallation later. Thoroughly clean all cabinet surfaces with a degreaser to remove grease and grime, then lightly sand them to create a good bonding surface for the new veneer.
Step 2: Measure and Order New Components
Accurate measurements are paramount. Carefully measure each cabinet opening for new doors and drawer fronts. Remember to account for proper overlay or inset styles. Also, measure the exposed surfaces of your cabinet boxes where veneer will be applied. Double-check all measurements before placing your order for new components.
Step 3: Apply Veneer to Cabinet Boxes
This is where the transformation truly begins. Cut your veneer pieces slightly larger than the surfaces they will cover. Apply contact cement or pressure-sensitive adhesive according to the manufacturer’s instructions. Carefully position the veneer, working slowly to avoid bubbles. Trim excess veneer with a utility knife and apply edge banding to exposed edges for a finished look.
Step 4: Install New Cabinet Doors and Drawer Fronts
Once the veneer is securely in place, it’s time to install your new cabinet doors and drawer fronts. Attach new hinges to the doors and mount them to the cabinet boxes. Install new drawer slides if you’re upgrading them, then attach the new drawer fronts. Adjust hinges and slides as needed to ensure proper alignment and smooth operation.
Step 5: Add Hardware and Finishing Touches
The final step involves installing your chosen cabinet hardware – knobs and pulls. This small detail can significantly impact the overall look of your newly refaced cabinets. Step back and admire your handiwork! Your kitchen has a brand new, custom look thanks to your DIY efforts.
Refacing vs. Replacing: Which is Right for You?
Deciding between refacing and completely replacing your kitchen cabinets is a common dilemma. Understanding the key differences can help you make the best choice for your home and budget.
| Feature | Cabinet Refacing | Cabinet Replacement |
|---|---|---|
| Cost | Significantly lower | Significantly higher |
| Timeframe | Days to a week | Weeks to months |
| Disruption | Minimal | Extensive |
| Structural Changes | None (retains existing layout) | Possible (can change layout) |
| Material Options | Wide variety of veneers, doors | Unlimited |
| DIY Feasibility | High | Low (typically professional) |
As the table illustrates, DIY kitchen cabinet refacing is an excellent option for those seeking a fresh aesthetic without major structural changes or a hefty price tag. If your existing cabinet boxes are in good condition, refacing is often the smarter, more efficient choice for a kitchen upgrade.
Myth Busting: Common Misconceptions About Cabinet Refacing
There are several myths surrounding cabinet refacing that can deter homeowners. Let’s clear up some common misunderstandings to help you make an informed decision about your DIY kitchen cabinet refacing project.
Myth: Refacing is only for old, cheap cabinets.
Fact: Refacing is suitable for any cabinet with structurally sound boxes. It’s a versatile solution for updating cabinets of all ages and quality levels, as long as the core structure is intact.
Myth: Refaced cabinets look cheap or fake.
Fact: With high-quality materials and careful installation, refaced cabinets can look indistinguishable from brand new ones. Modern veneers and new doors offer a premium finish that rivals custom cabinetry.
Myth: It’s too difficult for a DIY project.
Fact: While it requires precision and patience, DIY kitchen cabinet refacing is well within the capabilities of a dedicated homeowner. Many resources, including this guide, are available to assist you.
Frequently Asked Questions About DIY Cabinet Refacing
What is the average cost of DIY kitchen cabinet refacing?
The cost varies widely depending on the size of your kitchen, the materials you choose (veneer type, door style), and whether you replace hardware. However, it’s typically 30-50% less than the cost of new cabinets.
How long does DIY cabinet refacing take?
For an average-sized kitchen, a DIY refacing project can take anywhere from a few days to a week, depending on your skill level and the complexity of the design. Professional installation is often quicker.
Can I reface painted cabinets?
Yes, you can reface painted cabinets. The key is proper preparation: thoroughly clean and lightly sand the painted surfaces to ensure good adhesion for the new veneer.
What kind of veneer should I use for cabinet refacing?
Common options include wood veneer (for a natural wood look), laminate veneer (durable and easy to clean), and rigid thermofoil (RTF) which offers a seamless, painted appearance. Your choice depends on your desired aesthetic and budget.
Will refacing increase my home’s value?
A well-executed kitchen cabinet refacing project can significantly enhance your kitchen’s appeal and functionality, which can positively impact your home’s resale value, especially if the existing cabinets were severely outdated.
Conclusion: Achieve a Stunning Kitchen with DIY Refacing
DIY kitchen cabinet refacing is an accessible and rewarding home improvement project that can breathe new life into your kitchen. By carefully following this guide, selecting quality materials, and dedicating time to precise execution, you can achieve a high-end look without the high-end price tag. Embrace the challenge, and enjoy the satisfaction of transforming your space with your own hands. Your dream kitchen is closer than you think with a thoughtful DIY cabinet refacing guide.
