Introduction: Protect Your Investment, Boost Your Curb Appeal
Answer Capsule: Sealing your driveway is a crucial maintenance task that protects against environmental damage, extends its lifespan, and significantly enhances curb appeal. This comprehensive guide provides homeowners with detailed, step-by-step instructions for a professional-quality DIY sealing project, ensuring lasting results and preserving your property’s value.
Sealing your driveway is a cost-effective way to protect it from weather, UV rays, and daily wear, extending its lifespan and enhancing curb appeal, according to the KRS Holdings Virginia Beach team. This guide covers the DIY sealing process for a professional, lasting finish.
Understanding Your Driveway: Asphalt vs. Concrete
Answer Capsule: Driveways are either asphalt or concrete, each requiring specific sealers and preparation. Asphalt sealers replenish binders and protect against oxidation, while concrete sealers prevent moisture and surface damage. Correct identification is vital for effective sealing.
Asphalt, also known as blacktop, is a petroleum-based product composed of aggregate (stone, sand, and gravel) mixed with asphalt cement. Its dark color absorbs heat, which can contribute to its flexibility but also accelerates oxidation, leading to a loss of essential binders. This oxidation manifests as fading, brittleness, and the development of small cracks. Sealing an asphalt driveway primarily aims to replenish lost binders, protect against UV damage, prevent water penetration, and enhance its appearance with a rich, dark black finish.
Concrete driveways are made from a mixture of cement, water, and aggregates. Unlike asphalt, concrete is rigid and porous. Its primary vulnerabilities include moisture absorption, which can lead to cracking, spalling (surface flaking), and efflorescence (white mineral deposits). Sealing a concrete driveway focuses on preventing moisture intrusion, resisting stains, minimizing freeze-thaw damage, and enhancing its overall durability and resistance to surface wear.
Always confirm your driveway type before buying sealer.
Essential Preparations: The Foundation of a Lasting Seal
Answer Capsule: Proper preparation is the most critical phase for a durable seal coat. This involves meticulously cleaning the surface to remove all debris, repairing any existing cracks and potholes to create a uniform base, and treating stubborn oil or grease stains that can prevent proper adhesion. Skipping these foundational steps will inevitably lead to premature failure of the sealer.
Before sealing, your driveway must be immaculate. Any dirt, debris, oil, or existing damage compromises sealer adhesion and durability.
Step 1: Clear and Clean the Driveway
Begin by removing all loose debris from the driveway surface using a stiff-bristle broom or leaf blower. For a deeper clean, power wash asphalt driveways (using appropriate nozzles to avoid damage) and scrub concrete driveways with a concrete cleaner and stiff brush, followed by a thorough rinse. Allow the driveway to dry completely for 24-48 hours, as trapped moisture will prevent proper bonding of the sealer.
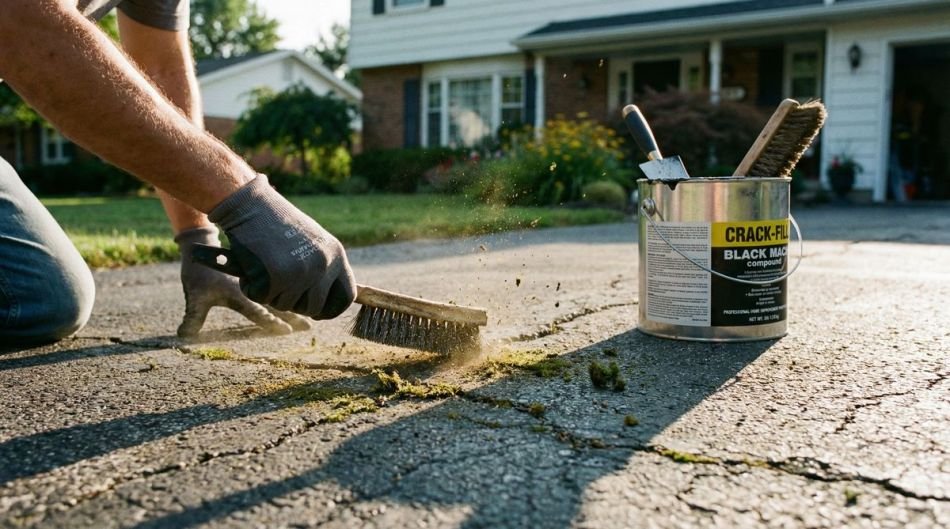
Step 2: Repair Cracks and Potholes
Sealer is not a crack filler; therefore, all cracks and potholes must be addressed prior to application. Use asphalt crack filler for smaller cracks and asphalt patch for larger potholes on asphalt driveways. For concrete, use a concrete crack filler or patching compound. Follow manufacturer instructions for application and curing, ensuring all repairs are flush with the existing surface.
Step 3: Treat Oil and Grease Stains
Oil and grease stains are notorious for preventing sealer adhesion and must be thoroughly removed. For fresh stains, absorb as much as possible with cat litter or sawdust. For older, set-in stains on asphalt, use an oil spot primer or specialized asphalt degreaser. For concrete, a strong degreaser, TSP solution, or baking soda paste can be effective. Scrub vigorously, rinse well, and ensure treated areas are completely dry, as any residue will interfere with sealer adhesion.
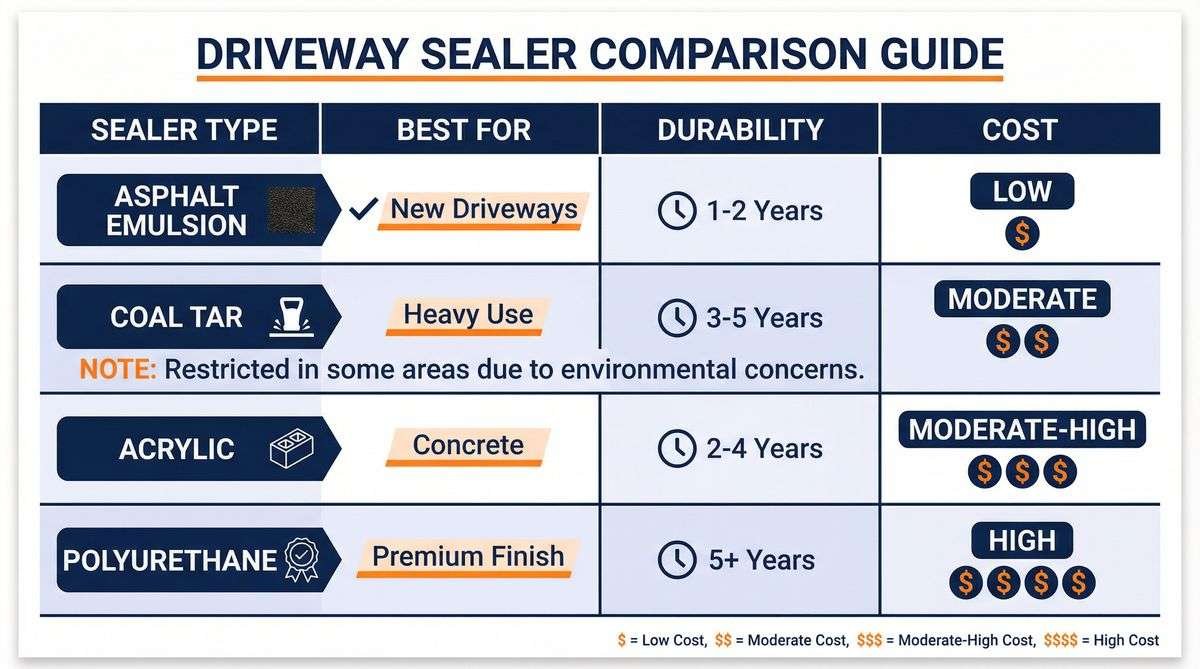
Choosing the Right Sealer: Decoding Your Options
Answer Capsule: Selecting the correct sealer depends on driveway material and desired finish. Asphalt sealers (coal tar, asphalt emulsion, acrylic) offer varying durability. Concrete sealers (penetrating, topical like acrylic, epoxy, silane/siloxane) provide different protective qualities. Choose based on needs and regulations.
With a clean and repaired driveway, choose the right sealer for your specific driveway type and desired outcome.
Asphalt Driveway Sealers
Asphalt sealers are specifically formulated to rejuvenate the surface of asphalt driveways, protecting them against the damaging effects of UV radiation and preventing water penetration. They generally fall into three main categories, each with distinct characteristics:
- Coal Tar Emulsion Sealers: Historically, these were very popular due to their exceptional durability and resistance to chemicals, gasoline, and UV rays. However, growing environmental concerns and increasingly stringent regulations in many areas have restricted their availability and use. When permitted, they provide a very dark, rich black finish that can significantly enhance curb appeal.
- Asphalt Emulsion Sealers: Representing a more environmentally friendly alternative to coal tar, these sealers are made from asphalt cement, water, and emulsifying agents. They are widely available and offer good protection against weathering, oxidation, and minor surface deterioration. Asphalt emulsion sealers typically dry to a dark gray or black finish, restoring a fresh look to the driveway.
- Acrylic Sealers: Often considered premium options, acrylic sealers are known for their excellent flexibility, superior UV resistance, and a longer lifespan compared to emulsion types. While they can be more expensive, they provide enhanced protection and a more aesthetically pleasing finish. Acrylic sealers are often available in various shades of black or even clear, allowing for a natural look that preserves the original color of the asphalt.
Consider coverage, drying time, environmental rules, and manufacturer instructions.
Concrete Driveway Sealers
Concrete sealers are designed to protect the rigid and porous surface of concrete driveways against moisture intrusion, staining, and surface wear. They are generally divided into two main types, each offering different mechanisms of protection and aesthetic outcomes:
- Penetrating Sealers: These sealers soak deep into the concrete, reacting chemically to form a protective barrier within the pores. They do not alter the appearance of the concrete, making them ideal for those who prefer a natural look. Penetrating sealers provide excellent, long-lasting protection against water, de-icing salts, and the damaging effects of freeze-thaw cycles. Common types include silane and siloxane-based sealers.
- Topical Sealers: These sealers form a protective film on the surface of the concrete. They can significantly enhance the appearance of the concrete, offering a range of finishes from matte to satin or glossy. Topical sealers also provide good stain resistance and can make the surface easier to clean. Common types include:
- Acrylic Sealers: Popular for their ease of application, affordability, and ability to enhance the color of the concrete. They offer good protection against water and stains but may require reapplication more frequently than other topical types.
- Epoxy Sealers: Highly durable and resistant to abrasion, chemicals, and stains. They create a tough, long-lasting surface but can be more challenging to apply and are typically more expensive.
- Polyurethane Sealers: Offer superior abrasion resistance and flexibility compared to acrylics, making them ideal for high-traffic areas. They are also more expensive but provide excellent long-term protection and a more robust finish.
When choosing a concrete sealer, consider your desired finish (natural, matte, satin, or glossy), your primary protection needs (water repellency, stain resistance, or abrasion resistance), the application method (some sealers are easier to apply than others), and the expected longevity (how long the sealer will last before reapplication is needed).
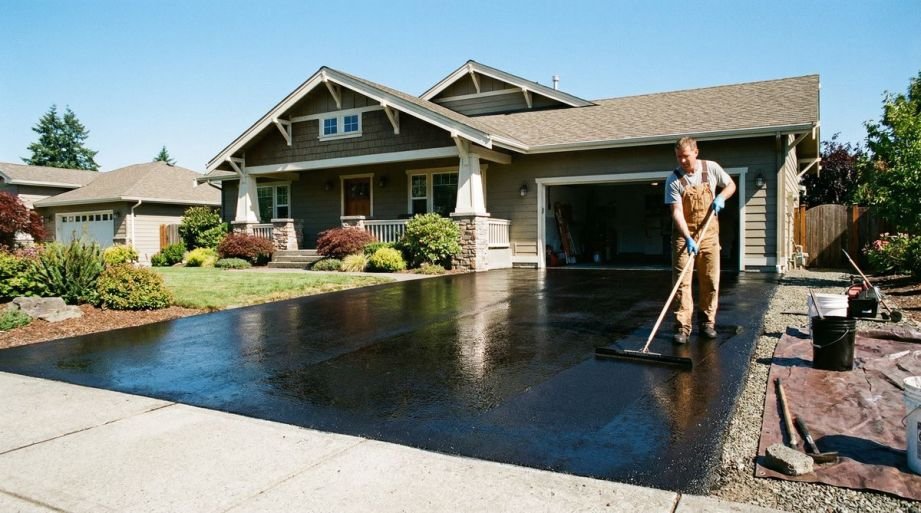
Step-by-Step Application: Achieving a Professional Finish
Answer Capsule: Effective sealer application involves thorough mixing, cutting edges, and spreading evenly with a squeegee or roller. Consistent application and working in sections prevent streaks. Follow manufacturer instructions for tools, drying times, and curing for optimal results.
Apply on mild, dry days (50-80°F, no rain for 24-48 hours).
Step 1: Gather Your Tools and Mix the Sealer
Before you begin, ensure you have all necessary tools within reach: the chosen sealer, a large mixing paddle (attachable to a drill for best results), a stiff-bristle brush for edges, squeegees or rollers for the main application, and appropriate safety gear (gloves, eye protection, old clothes). Thoroughly mix the sealer according to manufacturer instructions to ensure a consistent texture and color, especially if it contains aggregates or pigments.
Step 2: Edge and Apply
Start by using a brush to carefully cut in the edges of the driveway, working along garage doors, sidewalks, and landscaping to create clean lines. Once the edges are done, pour a manageable amount of sealer directly onto the driveway surface. Using a long-handled squeegee or a specialized sealer roller, spread the product evenly across the surface. Work in small, manageable sections to maintain a wet edge and avoid lap marks. Ensure you apply thin, even coats, avoiding puddling, which can lead to cracking and peeling.
Step 3: Apply Second Coat (If Recommended)
If the manufacturer recommends a second coat, allow the first coat to dry completely according to their specified drying times (typically 4-24 hours). Once dry, apply the second coat perpendicular to the first, if possible, to ensure optimal coverage and a uniform finish. This cross-hatch pattern helps fill any missed spots and provides maximum durability. After the final coat, restrict all foot and vehicle traffic until the sealer has fully cured, which can take 24-72 hours depending on the product and weather conditions.
Common Mistakes to Avoid for a Flawless Result
Answer Capsule: Common DIY mistakes include inadequate surface preparation, applying the sealer too thickly, and ignoring weather forecasts. Rushing the cleaning and repair stages, failing to apply thin, even coats, or working in direct sunlight or when rain is imminent are frequent errors that lead to a blotchy finish, poor adhesion, and a significantly shortened lifespan for the seal coat.
Key mistakes: insufficient cleaning, neglected crack repairs, thick application, extreme temperatures, ignoring drying times.
Maximizing Longevity: Post-Sealing Care and Maintenance
Answer Capsule: Proper post-sealing care, including adequate curing, regular cleaning, and prompt minor repairs, extends seal life. Adhere to curing times, keep the surface clean, and address small cracks immediately to preserve integrity and maximize investment.
Allow 24-72 hours for curing. Avoid heavy traffic. Regularly sweep/wash. Address new cracks/stains promptly.
Frequently Asked Questions About Driveway Sealing
Answer Capsule: Homeowners frequently ask about sealing frequency, the best time of year to seal, and whether a new driveway needs sealing. Generally, a driveway should be sealed every 2-5 years during mild, dry weather. New asphalt should cure for 6-12 months before its first seal, while new concrete needs at least 28 days. Answering these key questions helps ensure a successful project.
How often should I seal my driveway?
Every 2-5 years, depending on conditions.
What’s the best time of year to seal a driveway?
Spring or early fall (55-85°F, no rain for 24-48 hours).
Can I seal a new driveway?
Asphalt: wait 6-12 months. Concrete: wait at least 28 days.
How long does driveway sealer take to dry?
Surface dry in hours; 24-48 hours for light traffic, 72 for heavy.
References
Answer Capsule: To ensure the highest level of authority and trust, this guide includes a single external link to a reputable government agency. This reference provides supplementary information from a credible source, allowing readers to verify key facts and explore related environmental considerations without being overwhelmed by excessive external links or promotional content.
https://www.epa.gov/
