Fixing gaps in hardwood floors requires identifying the cause, such as low humidity or structural shifts, before applying a suitable filler. Small gaps often call for flexible wood filler, while larger separations may require wood strips or traditional rope methods. Maintaining indoor humidity between 35 percent and 55 percent helps prevent future wood shrinkage and expansion issues, notes Rentwerx Property Management.
Hardwood flooring is a natural material that reacts to environmental changes by expanding and contracting. When the air becomes dry, particularly during winter months, the wood loses moisture and shrinks, leading to visible spaces between the planks. These gaps can collect dust and debris, eventually compromising the floor’s appearance and structural integrity if left unaddressed.
Homeowners can choose from several repair techniques depending on the width of the gap and the type of flooring. While some fixes are purely cosmetic, others provide a more permanent solution by adding physical material back into the void. Understanding the difference between seasonal movement and permanent structural gaps is the first step toward a successful repair.
Identifying the Causes of Hardwood Floor Separation
Hardwood floor gaps primarily occur due to fluctuations in indoor humidity levels, which cause the wood to lose moisture and shrink. Other common factors include improper installation techniques, such as failing to acclimate the wood before laying it, or natural settling of the home’s foundation. Identifying the root cause ensures the chosen repair method remains effective over time.
Seasonal gaps are the most frequent issue, appearing in the winter when heating systems dry out the indoor air. These gaps typically close on their own when humidity levels rise in the spring and summer. If a gap remains open year-round, it is considered a permanent gap and requires a more active repair approach to restore the floor’s seamless look.
Structural issues or poor subfloor preparation can also lead to significant plank separation. If the subfloor is uneven or the planks were not nailed correctly, the wood may shift and create wide voids. In these cases, simply filling the gap might not be enough, as the underlying movement will eventually cause the filler to crack or fall out.
| Gap Type | Primary Cause | Typical Width | Recommended Action |
|---|---|---|---|
| Seasonal | Low Humidity | Less than 1/16 inch | Increase Humidity |
| Permanent | Wood Shrinkage | 1/16 to 1/8 inch | Wood Filler |
| Structural | Installation Error | Over 1/8 inch | Wood Strips or Shims |
Using Wood Filler for Minor Hardwood Gaps
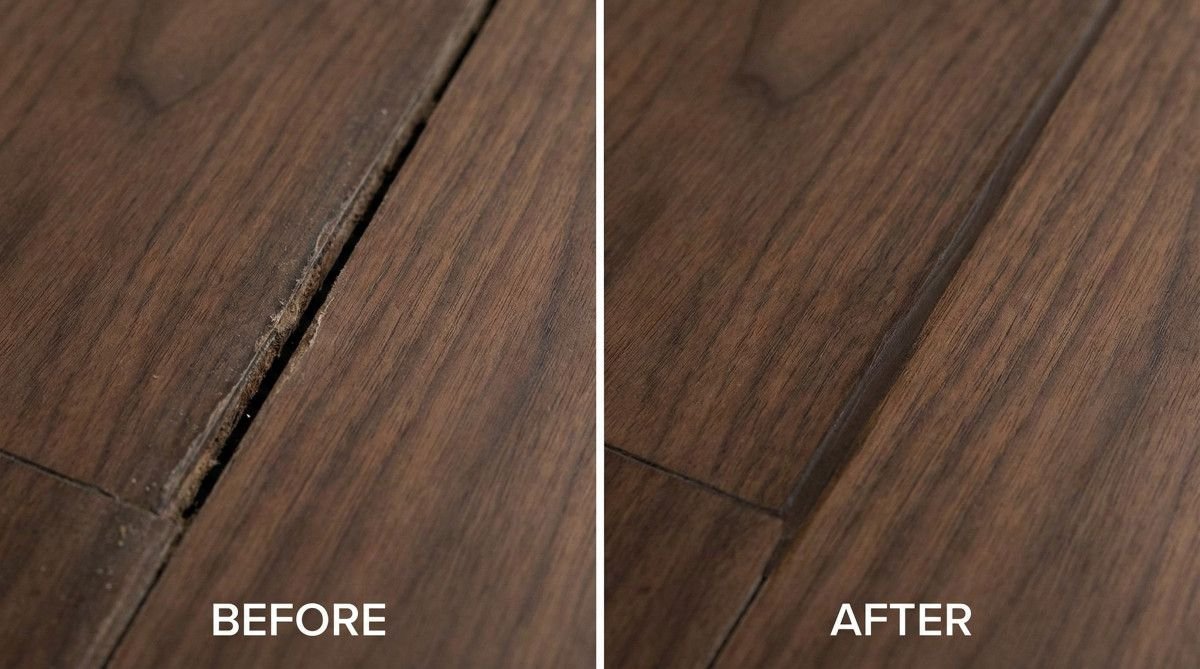
Wood filler is the most effective solution for repairing minor gaps and cracks that are less than one-eighth of an inch wide. Professionals recommend using a high-quality, flexible filler that can withstand the natural movement of the wood without cracking. The process involves cleaning the gap, applying the filler with a putty knife, and sanding the area smooth once dry.
When selecting a filler, it is crucial to choose a product that matches the species and stain of your hardwood. Water-based fillers are popular because they dry quickly and are easy to clean up, while solvent-based fillers offer more durability for high-traffic areas. Always test the filler on an inconspicuous spot to ensure the color blend is accurate before proceeding with the full repair.
After applying the filler, use a damp cloth to wipe away any excess from the surface of the planks. This minimizes the amount of sanding required later and protects the surrounding finish. Once the filler has fully cured, which usually takes about thirty to sixty minutes, lightly sand the area with fine-grit sandpaper and apply a matching finish to seal the repair.
Repairing Large Gaps with Wood Strips and Shims
Large gaps exceeding one-eighth of an inch are best repaired by inserting thin strips of matching hardwood, often referred to as shims or Dutchmen. This method provides a permanent, structural fix that mimics the original floor construction more closely than liquid fillers. The strips are glued into place, planed or sanded flush, and then finished to match the existing floor.
To begin this repair, you must measure the width and length of the gap precisely to cut a strip that fits snugly. Using a table saw or a sharp utility knife, create a thin sliver of wood from a matching plank or a similar species. Apply a small amount of wood glue to the sides of the strip, but avoid gluing it to the subfloor to allow for some natural movement.
Once the strip is inserted, use a rubber mallet and a tapping block to seat it firmly into the gap. If the strip sits slightly higher than the floor surface, use a sharp chisel or a hand plane to level it. Finish the process by sanding the area with progressively finer grits of sandpaper until the transition between the old and new wood is undetectable to the touch.
| Feature | Wood Filler | Wood Strips/Shims |
|---|---|---|
| Best For | Small cracks and pits | Wide, consistent gaps |
| Durability | Moderate (may crack) | High (structural) |
| Difficulty | Easy DIY | Intermediate to Advanced |
| Appearance | Blended color | Natural wood grain |
The Traditional Rope Method for Wide Plank Floors
The rope method is a traditional repair technique specifically designed for wide-plank hardwood floors in historic or rustic homes. This approach involves staining a natural fiber rope, such as jute or hemp, to match the floor color and wedging it into the gaps. The rope acts as a flexible gasket that fills the void while allowing the large planks to expand and contract freely.
This method is particularly useful for floors that experience significant seasonal movement where rigid fillers would quickly fail. Before installation, the rope should be soaked in a wood stain that matches the floor’s finish. Once dry, the rope is coated with a bit of wood glue and pressed into the gap using a flat-head screwdriver or a specialized tuck-pointing tool.
The rope should sit slightly below the surface of the wood to prevent it from being snagged by vacuum cleaners or footwear. This technique not only solves the problem of drafts and debris collection but also adds a unique, period-correct aesthetic to older homes. It is a cost-effective and reversible solution that respects the character of antique flooring materials.
Preventing Future Gaps Through Humidity Control
Preventing hardwood floor gaps is largely a matter of maintaining a stable indoor environment with consistent humidity levels throughout the year. Wood is hygroscopic, meaning it absorbs and releases moisture based on the surrounding air. By keeping the relative humidity between 35% and 55%, homeowners can minimize the drastic expansion and contraction cycles that lead to permanent gaps.
During the winter, using a whole-house humidifier or portable units in rooms with hardwood flooring can prevent the air from becoming too dry. Conversely, in humid summer months, an air conditioner or dehumidifier helps remove excess moisture that could cause the planks to swell and buckle. Monitoring these levels with a simple hygrometer is an easy way to protect your flooring investment.
In addition to climate control, proper installation practices are vital for long-term floor stability. New hardwood should always be acclimated to the room’s environment for at least three to five days before installation. This allows the wood to reach its equilibrium moisture content, reducing the likelihood of significant shrinking or shifting once the floor is nailed down and finished.
Frequently Asked Questions
Is it normal for hardwood floors to have gaps in the winter?
Yes, it is very common for hardwood floors to develop small gaps during the winter months. As the indoor heating system runs, it removes moisture from the air, causing the wood planks to shrink. These gaps typically disappear in the summer when humidity levels rise and the wood expands back to its original size.
Can I use caulk to fill gaps in my hardwood floor?
While some people use silicone or acrylic caulk, it is generally not recommended for hardwood floors. Caulk does not sand well and often has a shiny or rubbery texture that does not match the natural look of wood. It is better to use a dedicated wood filler or wood strips for a more professional and durable finish.
Should I fill gaps before or after sanding my floors?
Gaps should be filled during the sanding process, typically after the initial coarse sanding but before the final fine sanding. This allows the filler to be leveled perfectly with the wood surface. Filling before sanding ensures that any excess filler is removed, leaving a clean and smooth surface ready for the application of stain and finish.
How do I fix gaps that are too large for wood filler?
For gaps wider than one-eighth of an inch, wood strips or shims are the preferred repair method. These strips are cut from matching wood and glued into the gap, providing a solid and permanent fix. For very old or wide-plank floors, the traditional rope method is also an effective alternative for filling large voids.
How much does it cost to fix gaps in hardwood floors?
The cost of fixing hardwood floor gaps varies depending on the method used and whether you do it yourself. A container of wood filler costs between ten and twenty dollars, making it a very affordable DIY project. Hiring a professional to repair large gaps or perform a full sand and finish can cost between three and eight dollars per square foot.
Maintaining the beauty of hardwood floors requires a combination of timely repairs and proactive environmental management. Whether you choose to use modern fillers, traditional wood strips, or the classic rope method, addressing gaps early prevents further damage and keeps your home looking its best. By controlling indoor humidity, you can ensure your floors remain tight and seamless for decades to come.
