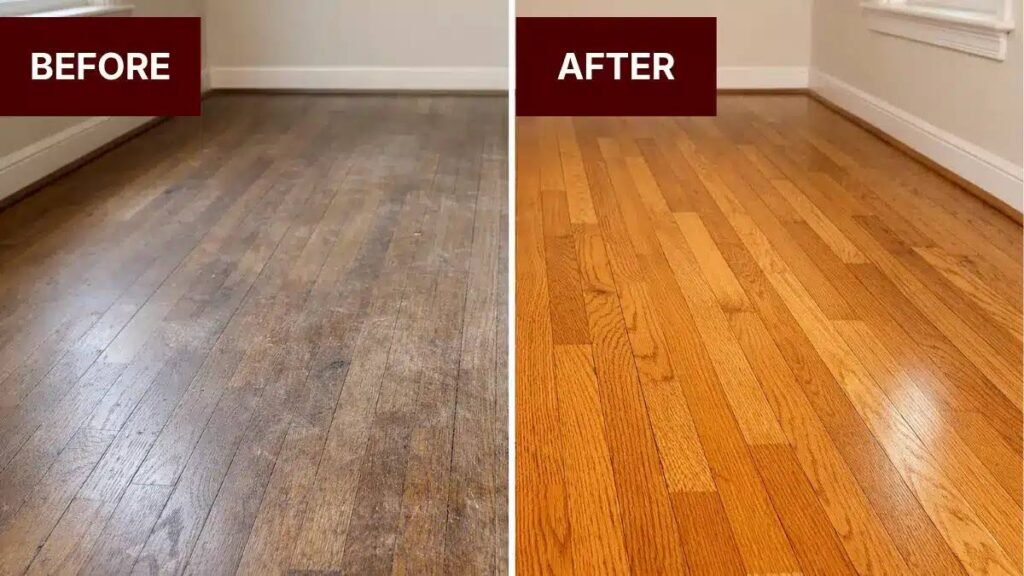
You have been covering that worn, scratched hardwood floor with area rugs for years. The finish is dull, there are scratches in high-traffic areas, and the wood looks nothing like it did when the floor was new. But underneath the wear and tear, the wood is still solid. The question is whether refinishing can restore it to its former beauty. Seeing floor refinishing before and after examples shows just how dramatic the transformation can be when done correctly by a professional, notes Keyrenter Hampton Roads professionals.
Hardwood floor refinishing can transform a worn, scratched, discolored floor into a surface that looks better than many brand-new floors. The process removes the damaged finish and surface imperfections, then applies a fresh stain and protective topcoat. The result is a floor that looks completely renewed at a fraction of the cost of replacement.
What a Floor Looks Like Before Refinishing
A floor that needs refinishing shows several clear signs of wear. The finish in high-traffic areas like hallways and entryways is worn through to the bare wood. Scratches from furniture, pet claws, and debris are visible across the surface. The wood may have dark spots from water damage or sun fading in areas exposed to direct sunlight through windows over many years.
Surface scratches are the most visible sign of a floor in need of refinishing. Fine scratches that catch the light are caused by daily wear from foot traffic and dust. Deeper scratches from moving furniture or pet claws may penetrate through the finish into the wood itself. These scratches hold dirt and make the floor look dirty even after mopping.
Discoloration is another sign that refinishing is needed. Areas near windows may be faded from UV exposure. Areas under rugs may be darker because the finish has not faded at the same rate as the exposed areas. Water stains from spills or leaks create dark spots that cannot be cleaned away. These discolorations are removed during the sanding process to reveal fresh wood underneath.
The Refinishing Process
The refinishing process starts with sanding the existing finish down to bare wood. A drum sander removes the old finish and surface scratches. An edge sander reaches corners and edges. The sanding starts with coarse grit sandpaper and progresses to finer grits for a smooth surface. The wood must be sanded evenly to avoid creating dips or uneven areas that show after staining.
After sanding, the floor is cleaned thoroughly to remove all dust. Holes and gaps between planks are filled with wood filler tinted to match the final stain color. The filler is sanded smooth after drying. The floor is then vacuumed and tack-clothed to remove every trace of dust before staining. Any remaining dust particles ruin the smooth finish of the stained floor.
Stain is applied to achieve the desired color. The stain penetrates the wood and highlights the natural grain. After the stain dries, two to three coats of polyurethane sealer are applied. Each coat must dry completely before the next coat is applied. The final coat is the protective surface that will withstand daily wear for years to come after the refinishing project is complete.
What a Floor Looks Like After Refinishing
A freshly refinished floor looks brand new. The scratches, stains, and worn spots are completely gone. The wood grain is visible and natural. The color is even across the entire floor with no fading or discoloration from one area to another. The surface has a smooth, glass-like finish that reflects light evenly across the room without the cloudy or dull appearance of an old, worn floor.
The level of gloss can be chosen based on your preference. High-gloss finishes create a shiny, reflective surface that shows off the wood grain. Satin finishes provide a subtle sheen that hides minor scratches better than high-gloss. Matte finishes have minimal shine and are the most forgiving of daily wear. Most homeowners choose satin finish for the best balance of appearance and practicality.
The color change from before to after can be dramatic. A floor that has faded to a pale, yellowish tone can be restored to a rich, warm honey color. A floor with dark water stains can be sanded and stained to a uniform dark brown or espresso color. The before and after difference is most striking for floors that had significant damage or heavy wear that has accumulated over many decades of use.
| Before | After | Transformation |
| Dull, worn finish | Smooth, glossy or satin finish | Full sanding removes all old finish |
| Surface scratches | No visible scratches | Sanding removes scratches down to bare wood |
| Dark water stains | Clean, uniform color | Stains are sanded out and re-stained evenly |
| Faded near windows | Even color across the room | UV damage removed, fresh stain applied |
| Gaps between planks | Filled, smooth surface | Wood filler fills gaps before sealing |
| Worn traffic paths | Uniform wear resistance | New protective coating on all areas |
Refinishing Cost vs Replacement Cost
Hardwood floor refinishing costs $3 to $8 per square foot. Replacing the same floor with new hardwood costs $8 to $15 per square foot for materials and installation. Refinishing saves 50 to 70 percent compared to replacement. For a 500-square-foot area, refinishing costs $1,500 to $4,000 versus $4,000 to $7,500 for replacement. The savings make refinishing an attractive option for homeowners on a budget.
A floor can be refinished three to five times over its lifetime, depending on the thickness of the hardwood. Each sanding removes about 1/16 inch of wood. Solid hardwood floors with a thickness of 3/4 inch can be refinished many times. Engineered hardwood floors with a thin veneer can be refinished one to two times depending on the veneer thickness.
The before-and-after value of refinishing extends beyond appearance. A refinished floor has the same structural integrity as a new floor. The wood is the same. Only the surface finish has changed. Refinishing preserves the original wood that may be higher quality than what is available in new flooring today. Older homes often have old-growth hardwood that is denser and more beautiful than modern replacements.
Timeline and Disruption
The refinishing process takes three to five days for a typical room. Day one involves sanding the floor. Day two is for applying stain. Days three through five are for applying polyurethane coats with drying time between each coat. The floor cannot be walked on for 24 hours after each coat of polyurethane is applied to allow proper curing and hardening of the protective finish layer.
The disruption during refinishing is significant. Furniture must be removed from the room. The sanding process creates fine dust that spreads throughout the house even with plastic sheeting and containment measures in place. The polyurethane fumes require good ventilation during and after application. Most homeowners schedule refinishing when they can be away from the home for several days.
After the final coat of polyurethane, the floor needs 24 hours before light foot traffic and three to seven days before furniture can be placed back on the surface. Area rugs should not be placed on the floor for at least two weeks to allow the finish to fully cure. Following these guidelines ensures the finish hardens properly and provides maximum durability for years of service.
A flooring professional with 22 years of experience explained: “The most dramatic before and after transformations I see are on floors that homeowners thought were beyond saving. They had deep scratches, black water stains, and worn traffic paths. After sanding and refinishing, those same floors look better than new because the wood underneath is old-growth timber that has a tighter grain and richer color than anything you can buy today. I tell people to refinish before they replace every time.”
DIY vs Professional Refinishing
DIY floor refinishing saves $3 to $8 per square foot in labor. For a 500-square-foot floor, the savings are $1,500 to $4,000. However, DIY refinishing requires renting a drum sander, edge sander, and buffer at a cost of $100 to $200 per day. The sanding equipment is heavy and difficult to operate without experience. Uneven sanding creates visible dips and scratches that show through the new finish.
Professional refinishing ensures a smooth, even result that looks like a factory finish. Professionals have experience with drum sanders and know how to avoid creating dips and gouges in the wood. They also have commercial-grade sanding equipment that produces a finer finish than rental machines. The professional result is usually worth the cost for the quality difference in the finished appearance.
The before and after difference between DIY and professional refinishing is visible in the smoothness of the finish and the evenness of the stain. Professional refinishing produces a consistent, glass-smooth surface. DIY refinishing often has visible sanding marks, uneven stain absorption, and orange peel texture in the polyurethane. For most homeowners, the cost savings of DIY are not worth the compromised appearance.
Frequently Asked Questions
How much difference does floor refinishing make?
Refinishing makes a dramatic difference. Worn, scratched, discolored floors look brand new after sanding, staining, and sealing. The transformation is one of the most cost-effective home improvements available.
Can a floor be too worn to refinish?
A floor cannot be refinished if the wood is too thin. Solid hardwood can be refinished 3 to 5 times. Engineered wood with thin veneer may only allow 1 refinishing.
Can I change the color when refinishing?
Yes, you can change the color with stain. Lighter stains show more wood grain. Darker stains hide imperfections. The color change is one of the most dramatic before and after differences in refinishing.
Is DIY or professional refinishing better?
Professional refinishing produces a smoother result. DIY saves money but risks visible flaws. Professional work provides the best transformation for most homeowners.
How long does the refinishing process take?
The process takes 3 to 5 days for a typical room. Sanding takes 1 day. Staining takes 1 day. Applying polyurethane takes 1 to 3 days with drying time between each coat for proper curing.
How long before I can walk on a refinished floor?
Light foot traffic is allowed after 24 hours. Furniture can be placed after 3 to 7 days. Area rugs should wait at least 2 weeks for the finish to fully cure and harden properly.
Are refinishing fumes dangerous?
Polyurethane fumes are strong and can be harmful. Good ventilation is essential. Water-based polyurethane has lower fumes and dries faster than oil-based. Most families leave the home during refinishing.
How long does a refinished floor last?
A refinished floor lasts 7 to 10 years. Lifespan depends on traffic, maintenance, and the quality of the finish applied.
