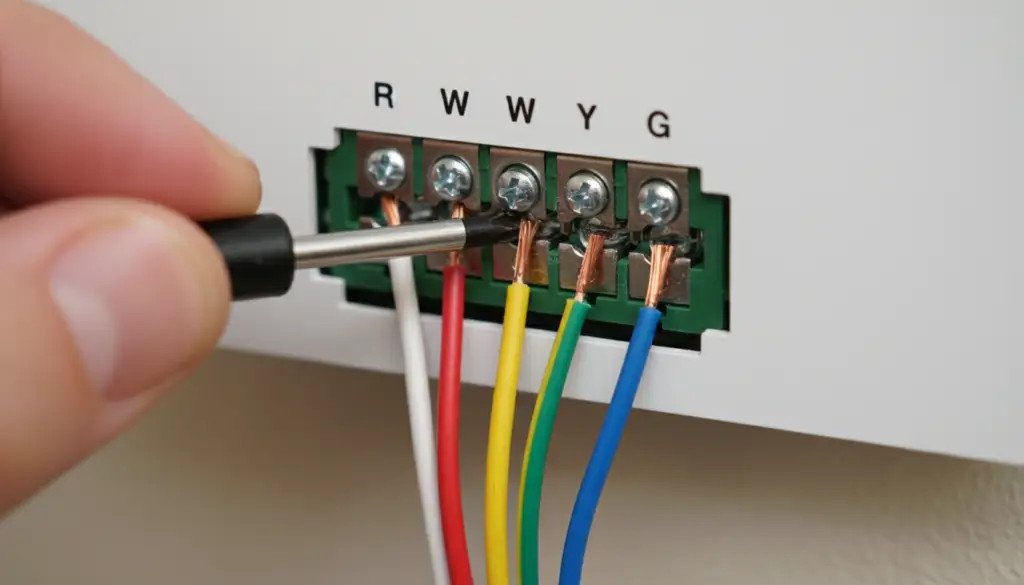
On thermostat how to install, the safe order is check compatibility, shut off power, label the wires, wire by the letter markings, and test, and most capable homeowners can do it in about half an hour. The work is low-voltage and straightforward when you are replacing a similar unit on a standard system, but the whole job begins with two checks, that the new thermostat fits your system and that the power is really off. Do those first and the wiring falls into place.
Below is the compatibility check, the step-by-step order, the wire letters, and when to bring in a professional instead.
Check Compatibility Before You Buy
Not every thermostat fits every home, so the purchase and the install both start with compatibility. Confirm three things: the system type, conventional or heat pump, since they use different wiring and modes; the voltage, since most home thermostats are low-voltage, while electric baseboard and some radiant-heat systems use line-voltage and need a different, often professional setup; and the wiring, specifically whether there is a common, or C, wire for power, which many smart thermostats need to run. A brand’s compatibility selector, like the Honeywell thermostat selector, walks these checks with your system. If you are unsure what you have, check the equipment’s own literature or call an HVAC pro before buying, because a mismatched unit either will not work or can damage equipment.
The Safe Five-Step Install Order
Work in this order and the job stays safe. First, shut off the HVAC system’s power at the breaker panel, not just at the thermostat, and confirm it is off by trying the old thermostat, since a live wire is the one mistake that can cause real trouble. Open the old thermostat and take a photo of the wiring before you touch anything, then label each wire with its letter, because that record is what lets you reconnect without guessing, per the Carrier thermostat installation guide. Remove the old unit, mount the new base plate on the interior wall, and connect each labeled wire to the matching terminal, pushing the copper fully in so it does not touch an adjacent terminal. Restore power last, walk through the setup, and confirm the system heats and cools correctly.
Which Wires Go Where
According to Keyrenter St. Louis West professionals, the letter on each wire tells you where it goes. R, sometimes Rc or Rh, is the power wire; C is the common wire that supplies power to run the smart thermostat; W carries the heating signal; Y carries cooling; G runs the fan; and O or B is the reversing valve on a heat-pump system.
Match each labeled wire to the same letter on the new thermostat. If your old thermostat showed fewer letters than the new one expects, that is where a missing C wire or a system-type difference matters, which is exactly what the compatibility check was for. When in doubt, the photo you took and the new thermostat’s wiring guide beat guessing.
DIY, Electrician, or an HVAC Pro?
Whether you should attempt the install yourself depends on the system. A thermostat swap is a good DIY job when you are replacing a similar unit on a low-voltage system and feel comfortable around a labeled wire, which covers the majority of modern homes.
It is time to call an electrician or an HVAC professional when the wiring is line-voltage, for electric baseboard or radiant heat, when it looks damaged or modified, or when you have limited electrical experience, since a pro brings code compliance and the tools to diagnose wiring issues. You do not usually need an electrician for a straightforward low-voltage thermostat replacement done by a diligent homeowner.
The cost stays modest either way: a smart thermostat commonly runs from about seventy to three hundred dollars for the device, and professional installation brings the total to roughly two hundred to five hundred dollars depending on the wiring and compatibility. That is usually for the capable-person DIY path is a device-only cost, and the pro option adds installation for peace of mind.
Placement, and the Final Test
Where the thermostat sits matters for how well it reads the room. Mount it on an interior wall, away from direct heat sources like a stove, away from drafts, and away from vents, because a thermostat next to a register reads the register’s air, not the room, and runs the system longer than needed. After you restore power and complete the setup, test both sides: switch to heat and confirm the furnace or heat pump responds, then switch to cooling and confirm the same. If either side fails to respond, check the wire connections before calling a pro.
Thermostat Install: Common Topics
Can I install a thermostat myself?
Yes, for a straightforward replacement of a similar low-voltage thermostat on a standard system, a careful homeowner can do it in about half an hour by turning off the breaker, labeling the wires, and matching the letters. Call a professional when the wiring is line-voltage, damaged, or you are unsure of the system.
How do I know which wires go where on a thermostat?
Each wire’s letter tells you its terminal: R is power, C is common, W is heat, Y is cooling, G is the fan, and O or B is the heat-pump reversing valve. Match each labeled wire to the same letter on the new thermostat, using a photo of the old wiring as your record.
Do you need an electrician to install a thermostat?
Usually not, for a low-voltage thermostat replacement that a capable homeowner can do safely. You do want an electrician or HVAC pro when the wiring is line-voltage, like electric baseboard heat, or damaged, or when you are not comfortable with the electrical work.
Can I replace my thermostat with any thermostat?
No. The new thermostat must match your system type, conventional versus heat pump, and your voltage, low versus line, and have the wiring it needs, often a C wire. Use the brand’s compatibility selector or check your equipment before buying.
How much does thermostat installation cost?
A smart thermostat commonly runs about $70 to $300 for the device, and professional installation brings the total to roughly $200 to $500 depending on the wiring and compatibility. Do it yourself and the cost is the device alone.
Follow the safe order and a thermostat install is a quick, rewarding job. Confirm the new unit matches your system and wiring, shut the HVAC off at the breaker, photograph and label the old wires, wire the new base so the letters line up, then restore power and confirm it heats and cools. Leave line-voltage or doubtful wiring to an electrician, and every step stays safe. Check and label first, power and test last.
