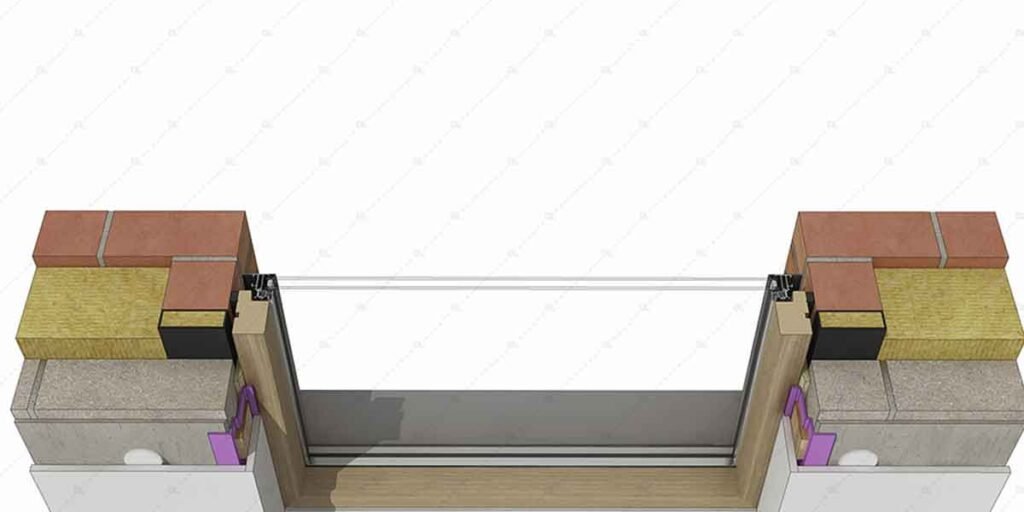
Read a window installation diagram as a scope document. The opening size comes first, then the flashing lap direction, and those two lines decide whether the window fits the hole and whether the hole stays dry.
It fixes what the installer owes the building: the size to order, the layers to tape, the fasteners to use, and the order those things happen in. Plenty of sheets bury one of the sizes in a note, or leave it off entirely.
The two sizes a drawing carries
A sheet that shows one number for size is incomplete, because there are always two. Rough opening is the framed hole left for the window. Unit size, sometimes written as the frame size or the daylight opening (D.L.O.), is the window itself.
The factory builds to unit size. The framing crew builds to rough opening. Manufacturers publish a rough opening table for every model they sell, and that published figure is what an order is written against, not a tape held against an old frame.
A replacement blurs the pair. An insert window is ordered to the opening the old frame leaves behind, so one sheet can list the dimension twice with different tolerances on each line.
Which number to measure
Measure the opening at three points on each side and keep the smallest one.
A rough opening that has racked slightly out of square passes a single center measurement and still binds the sash.
Write that number on the framing in pencil.
Marker on a stud outlives the day; a note in a phone does not survive one trip to the lumber yard.
Head, jamb, and sill: what each detail controls
A window installation detail drawing shows three edges. The head at the top sets where flashing laps, the jambs at the sides set how the frame ties into the weather barrier, and the sill at the bottom sets where water goes once it gets past the siding.
Each edge carries its own layer, and the drawing is where the layering belongs. The sill gets a pan, a shallow tray that slopes toward the exterior and turns up at both ends so water cannot run back under the frame. The jambs get flashing that tucks behind the head piece, and the head gets a flashing that throws water out over the top flange.
Fastener spacing sits on the same sheet.
Most instructions give a schedule instead of a single number, tighter near the corners and short of the frame edge so screws do not crack the vinyl or split the jamb extension, and the drawing either carries that schedule or points to the sheet that does.
What happens when the detail and the instruction sheet disagree? The instructions control the window, the drawing controls the opening, and someone has to reconcile the two before the first screw goes in.
Flashing order is where these details usually fail
Exterior flashing laps like shingles. Every layer overlaps the one under it, so water that gets behind the siding drains out instead of working inward, and the order runs from the bottom up.
On a typical sheet the sequence reads sill pan first, window set on the pan, jamb flashing tucked behind the head, then head flashing over the top flange with the weather barrier lapping over the flashing ends. The note line is where the lap direction lives, and a sheet without that note leaves the most important step to habit.
| Edge | What the sheet should show | What gets left off | What turns up later |
|---|---|---|---|
| Head | Head flashing over the top flange, weather barrier lapping the flashing ends | The lap direction | Water at the top corner, soft sheathing above the frame |
| Jambs | Jamb flashing behind the head piece, taped or lapped to the barrier | Tape type and seam placement | Staining on the interior reveal after driving rain |
| Sill | Sill pan with end dams, sloped toward the exterior | The slope | Standing water at the sill, a rotted sill plate |
| Fasteners | Spacing and type from the instruction schedule | Edge distance at the corners | Bowed sashes, cracked frames, hardware that drags |
ASTM E2112, the standard practice for installing exterior windows, doors and skylights, is the document most instructions are written against. AAMA/WDMA/CSA 101/I.S.2/A440, the North American Fenestration Standard, is the product-side standard the building codes cite for the window itself. Neither one draws the lap for the building in front of you.
I have laid jamb flashing after the head on a stucco elevation because the instruction sheet assumed lap siding, and the interior reveal stained within the first month. The order is not a preference.
What a drawing cannot carry
A drawing fixes sizes, laps, and fastener schedules. It cannot describe the condition of the opening it is drawn over, and that condition decides the sequence and the labor behind it.
Wall construction is the largest of those variables, and it decides the plane the frame is fastened to. A house with rigid foam outside the sheathing needs the flange held against a different plane than a house with felt paper and lap siding, because the foam moves the drainage plane outward by an inch or more. Stucco needs a weep screed and a gap so water can leave. Brick veneer needs the frame kept off the brick with the flashing turned up behind it, and a masonry opening that has never held a window usually needs a buck or a jamb extension built before anything can be fastened.
The inputs the sheet leaves out
None of that is drawn. What the opening is built from, how much exterior finish comes off and goes back, whether the old frame is cut out or left in place: the sheet is silent, and the price is not. These are the same inputs a window installation estimate is built from, which is why two quotes for the same model rarely match.
Rot reorders the work more than any other finding.
A soft sill or a rotted jack stud is a repair, not an installation, and the window waits until the repair is finished.
Check the opening against the escape-opening rule
Emergency escape and rescue openings need at least 5.7 square feet of net clear opening, a net clear height of 24 inches, a net clear width of 20 inches, and a sill no more than 44 inches from the floor. Those are the International Residential Code minimums, and they apply to what the open sash leaves.
Net clear opening is the space left after the sash and frame take their share, and the operator type decides how much that is. A casement swung open leaves close to its full width. A slider leaves about half. A single-hung leaves the lower sash area only.
A daylight opening on a drawing promises nothing about escape. The two are checked separately, and the check belongs before the order goes out, since a window that misses the figures by an inch or two leaves no room to move the frame.
The dimensions do not add up the way most people assume. A 20 inch by 24 inch opening comes to about 3.3 square feet, well short of the 5.7 the area rule asks for, so a 20 inch wide sash needs roughly 41 inches of clear height and a 24 inch high sash needs about 34 inches of width. Operator type decides the result: a double-hung that opens halfway through a 44 inch frame leaves about 22 inches of clear height, under the minimum, while a casement in the same opening usually clears it.
Residential replacements sit inside a permit and inspection system in most jurisdictions, and inspection is where the labels, the rough opening, and the escape dimensions get compared with the documents. That is also where an unpermitted second visit costs more than the first one would have.
Where the diagram stops and a professional starts
Three conditions move the work off a homeowner’s list: a house built before 1978 with painted surfaces at the opening, an opening more than six feet above a lower level, and structural rot or a racked frame. Each one is a stop point.
- Pre-1978 paint. EPA’s Renovation, Repair and Painting rule requires firms that disturb lead-based paint in homes, child care facilities and kindergartens built before 1978 to be EPA- or state-certified and to use certified renovators who follow specific work practices. Prying a frame, cutting, and sanding all disturb paint.
- Height. OSHA 29 CFR 1926.501(b)(1) requires fall protection at six feet or more above a lower level. A second-floor window usually sits past that line, and a ladder is not a fall protection system.
- Structure. A rotted sill, a soft header, or an opening that has racked needs repair before a window goes in. That work belongs to a carpenter or an engineer, and no installation sheet authorizes it.
Everything else comes down to time, tools, and weather. A ground-floor insert replacement on sound framing is a reasonable weekend. The same window on the second floor with stucco outside is a different job with a different risk. Local codes and the manufacturer’s instructions govern the work, and where a sheet conflicts with either one, the conflict gets settled before anything is cut.
Window installation diagram questions
What order does a window installation follow?
Order to the unit size, frame to the rough opening, then flash from the bottom up: sill pan, window, jamb flashing, head flashing, siding. Each step closes a path water could take, so the order carries as much weight as the work itself.
What is the proper way to install windows?
The proper window installation matches three things to the instructions: the rough opening tolerance, the flashing lap order, and the fastener schedule. Water control comes from the lap order, and it fails quietly, so a window set dead level with the flashing reversed passes a level check and leaks for years.
What are common window installation mistakes?
The four that show up most often are ordering from a tape measurement instead of the published rough opening, flashing the head before the sill, skipping the sill pan, and shimming at the corners where the frame is weakest. None of them looks wrong on the day of the install.
Should you nail the top flange of a window?
Most instructions leave the top flange unfastened so the head flashing can lap over it and the frame can move with the building; where fastening the top is allowed, the sheet says so. Head flashing, not the fastener pattern, keeps water out at the top.
The drawing earns its keep twice: when the order is written against its sizes, and when the opening is checked against them with a tape and a level.
