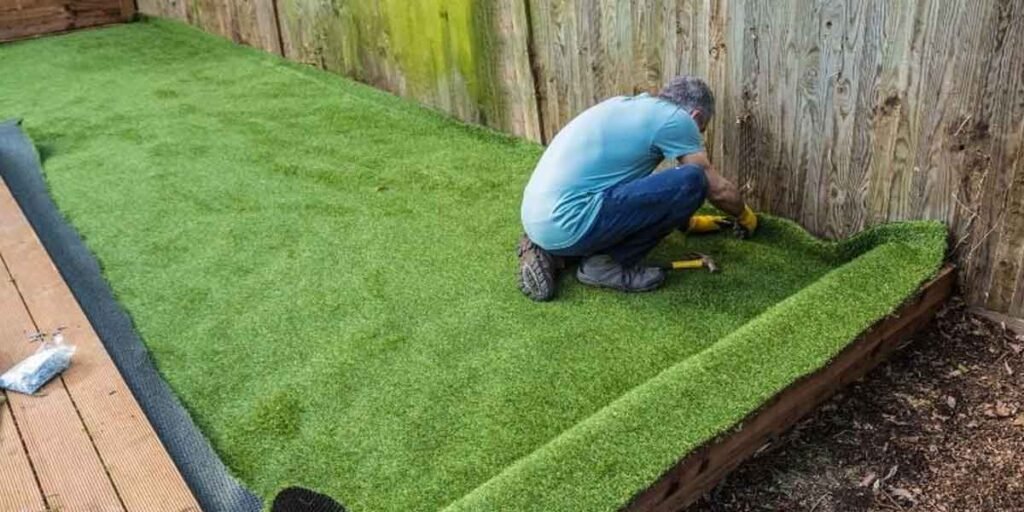
Artificial grass how to install, in one line: excavate, compact a stone base, then roll out the turf.
That sequence is the method, and the surface still sits flat after a wet winter only if the layers underneath were built for water and packed in lifts. Those two conditions carry more weight than the pile height or the color you pick at the showroom.
Artificial Grass hides those decisions the moment it comes off the roll. Grading done by eye, a drain that was never tested, a seam that takes foot traffic before the adhesive cures: all of it looks fine for a season, then shows up at once.
What Has to Be True Before You Unroll Anything
Water has to leave the site, the ground has to fall away from structures, and local rules have to allow the surface. Dig a 12-inch test hole, fill it with water, and time how long it takes to disappear. Ground that holds that water for hours needs added drainage or a different build.
The test takes twenty minutes and it screens the mistake that costs the most to undo. Clay soil, compacted fill left behind by an old patio, and shallow rock all behave the same way under standing water. They keep it.
Drainage also needs an exit at the perimeter. Where the ground percolates, a gentle, consistent fall away from the foundation is enough. Where it does not, the design changes: a perforated line, a gravel-filled trench at the low edge, or a build that raises the surface instead of digging into it.
Call 811 before the first shovel goes in. That duty comes from state damage-prevention law, not from a federal statute, and most states require notice two to three days ahead of excavation so operators can mark buried lines, per PHMSA. The marks arrive with a tolerance zone, and inside that zone many states expect hand digging rather than a machine bucket.
The numbers behind the rule are not decorative. PHMSA counted 85,606 excavation damages to gas distribution facilities in 2025 across 35.8 million locate tickets, and it attributes more than 875 pipeline incidents since 2005 to excavation, with 40 fatalities, 166 serious injuries, and about $322 million in property damage.
Homeowner association covenants and some municipal codes restrict synthetic surfaces. Turf also should never go down over live grass, because the old root zone compacts, holds moisture, and settles unevenly under the finished surface.
Artificial Grass How to Install, Stage by Stage
Mark the outline, strip the organic layer, install edge restraint, build and compact the base in lifts, screed it flat, then roll, cut, seam, and infill. Budget one long day for preparation and a second, drier day for the turf itself.
Excavate and Shape the Area
Remove vegetation, roots, and soft topsoil to a depth of about 2 to 3 inches, then bring the subgrade to the shape and fall you want water to follow.
On a patch smaller than a parking space, a spade and a wheelbarrow will do the work at the cost of a long weekend. Above that size, a mini excavator rental pays for itself in a morning.
Set the Edge, Then Build the Base in Lifts
Edge restraint goes in before the aggregate does. It keeps the stone where you put it, and edge restraint is what stops a finished lawn from spreading at the border. Nails driven into soft ground alone do not hold it.
Class 2 road base at 2 to 3 inches is the common specification for residential work, added one wheelbarrow load at a time from the far end of the opening. Each lift gets raked level, misted lightly, and compacted in several passes with a plate compactor until the surface rings solid underfoot.
Stay off fresh base material while it is still soft, because footprints left in an uncompacted lift stay there and collect water later. Compacted base also settles another half inch to an inch under use, so build the finish grade slightly higher than the final surface you are aiming for.
Screed It Flat, Then Check With a Straightedge
A thin layer of fine, angular material over the compacted base gives the turf a smooth bed. About an inch of paver base sand or sharp sand is typical on residential jobs, and a flat result is won or lost in this layer.
Check it with an 8-foot straightedge laid in four directions, and fix whatever the straightedge finds before turf is anywhere near the site. Indoor floor work runs on the same two questions, which is why hardwood flooring how to install begins with whether the substrate is flat and whether the material has settled to the room; turf asks the identical things, in direct sun, with a wider tolerance for flatness and a shorter one for drainage.
Acclimation is the second half of that rule.
Turf unrolled cold or unfolded from tight storage often carries wrinkles that relax after a few hours of daylight, so lay the panels out and let them settle before you cut anything.
Roll, Orient, Cut, and Seam
Unroll turf rather than dragging it across the base, and lay every panel with the grain running the same direction. Panels set against each other read as two different lawns under afternoon light, and that difference will not fade.
Cut from the back of the material, following the stitch rows, which keeps a straight line without shaving the face of the pile.
Seaming means matching the stitch lines, sliding seaming tape underneath with the bonded side down, and gluing or nailing to the manufacturer’s specification. Turf seam adhesive sets in twenty to thirty minutes, and a seam that takes traffic inside that window will open later.
Fasten the Edges and Brush In the Infill
Edge nails run 5 to 6 inches long at 3 to 6 inch spacing around the perimeter, angled through the backing and into the restraint.
Infill goes in last. Spread it across the surface and work it down between the blades with a stiff broom or a power broom, typically 1 to 3 pounds per square foot depending on pile height and traffic. Blades standing upright after brushing are the signal that enough material has settled to the base of the pile.
The Checkpoints That Decide How Long It Lasts
Four checks catch almost every defect while the fix is still cheap: base settlement, a soak test, a straightedge, and infill depth. Each takes minutes, and each one can be repeated on a lawn somebody else installed.
- Base settlement. Compacted aggregate drops roughly half an inch to an inch below the loose depth. Build the grade high by that amount and water spreads across a flat surface instead of collecting in a bowl.
- Soak test. Run a hose over one section for 20 minutes before turf goes down. Water that pools and stands sends the plan back to drainage, before any material is committed.
- Straightedge. An 8-foot straightedge in four directions shows the high spots and dips that an eye forgives and a finished surface does not.
- Infill depth. The measurement is a depth gauge, or a nail and a tape measure on a grid. Uneven depth is what makes one part of a lawn feel firm and another part feel like carpet.
One more check belongs on a calendar rather than a to-do list. Walk the seams and edges monthly through the first season. A joint that opens more than 12 inches is a call back to the installer under the guidelines the Synthetic Turf Council publishes, and shorter openings get repaired immediately because they are a tripping edge.
Where These Installs Fail
Nearly every failure traces to one of five causes: water with no exit, a base that was never compacted in lifts, a seam that was rushed, a border with no restraint, or a site the material could not survive.
Wavy borders come from edges nailed into soft ground instead of into a restraint or a compacted shoulder, and the perimeter keeps moving while the middle of the field stays put.
Ponding comes from grading by eye and skipping the soak test. Repair means lifting turf, reworking base, and relaying. Clay subsoil under a low corner is the most common place it happens, and it is the one place a 20-minute test would have caught it.
Seam failure costs more than it looks, because adhesive sets on the manufacturer’s schedule and cool, damp weather stretches that time. When a seam takes traffic early, or tape picks up grit before it is covered, the joint lifts and the repair means cutting out a strip of turf.
Weeds come up at the edges and around penetrations, where the fabric and the restraint leave gaps. Weed fabric under turf is standard on garden installations, and it is not recommended for pet installations, where drainage matters more than suppression and a fabric layer slows water on its way down.
Heat is the failure nobody budgets for. Williams and Pulley measured synthetic surfaces at Brigham Young University in 2002 and reported a surface 37F hotter than asphalt and 86.5F hotter than natural grass, with an average summer daytime surface of 117F against 78F for natural turf and a high reading of 200F on a 98F day. Irrigation dropped a test surface from 174F to 85F, and it climbed back to 164F within twenty minutes.
Anyone planning turf where children or dogs spend an afternoon should measure surface temperature on the hottest day of the year before ordering material.
Odor in a pet area is a cleaning schedule problem more than a material problem. Waste picked up promptly, the surface rinsed, and the area left to dry handles most of it, and infill sold with an antimicrobial treatment exists for the same reason.
Maintenance Timing After the Install
Expect more upkeep in the first season than in year three, because infill settles after installation and rainfall. The Synthetic Turf Council’s maintenance guidelines put the long-run budget at one hour of inspection and maintenance for every ten hours of use.
For the first few months, brushing more often is normal advice while infill works its way down into the pile. After that the routine shortens to redistributing infill where traffic concentrates, checking seams, and keeping debris off the surface.
Two rules protect the material. Brushes carry synthetic bristles only, never metal, and the surface gets brushed dry, in alternating directions. Aggressive brushing wears fibers faster than leaving the surface alone.
Once a year, schedule a deeper pass: infill restoration across the whole surface, weeds at the edges, a look at the fasteners, and, on heavy-use surfaces, decompaction of the infill layer.
When to Stop and Call an Installer
Hand the work over when the ground will not drain, when the base is a slab, when the layout needs several seams, or when the utility marks land somewhere you cannot work around. Those four conditions turn a weekend project into a warranty problem.
A slab, a concrete patio, or a rooftop deck cannot take aggregate excavation, and turf laid straight over a hard surface traps water underneath it. The build switches to a drainage cell: a honeycomb panel with roughly 95% open volume that sits between the hard surface and the turf, holds close to half a gallon of water per square foot of surface, and passes the rest to a perimeter drain. That is a different trade with different equipment, and it is priced as its own trade.
A layout with four or five seams is where you want a second set of hands and some experience with seaming tape.
One seam on a flat rectangle is a reasonable first attempt.
Utility conflicts stop the work instead of rerouting it. If the marked line crosses the area, if the sprinkler main runs through it, or if the fall you need points into a foundation, the answer is a designer or an installer.
Surfaces built for constant use, a playground or a pet run, raise the specification further: a shock pad under some commercial builds, a deeper specified infill, and a drainage and compaction design sized for traffic.
Artificial Grass or a Watered Lawn
Watering an established lawn takes less water than most people assume. EPA WaterSense guidance puts the figure at about one inch per week including rainfall, applied deeply in two sessions and timed for early morning.
The savings from switching are smaller than the marketing suggests. WaterSense reports that up to half of outdoor water can be lost to wind, evaporation, and runoff, and that homes with automatic irrigation use roughly 50% more water outdoors than homes without it. A rain sensor and a working schedule recover a large share of that difference for a fraction of a turf project’s cost.
Turf does not come with a zero water bill either. Pet areas get rinsed, the surface gets hosed down in dusty stretches, and hot turf gets cooled with water when people are on it.
The practical comparison: turf trades watering for cleaning and periodic maintenance, and it makes sense where a lawn has already failed for reasons water cannot fix. Turf over clay in deep shade is a drainage project wearing a green top.
FAQ
How do you prepare the ground for artificial grass?
Strip vegetation and soft topsoil to about 2 to 3 inches, confirm the ground drains, install edge restraint, and build a compacted aggregate base with a thin screeded layer on top.
The base carries the load and the turf only covers it.
What should you put down before laying artificial grass?
You put down a compacted aggregate base, then a fine leveling layer over it. Weed fabric goes over the base on garden installs, and it is normally left out on pet installs, where drainage matters more.
What do you put underneath artificial grass?
On soil, the layers are compacted subgrade, aggregate base, and a screed layer. On concrete or a patio, those layers are replaced by a drainage cell or a drain mat with a perimeter outlet, because water cannot pass through the slab.
Can you install artificial grass by yourself?
Yes, on a small, flat, well-draining area with one seam or none.
Artificial Grass installation becomes a two-person project once the layout needs several seams, slope work, or a base built over a slab.
